Tag - Rip Software

Understanding the advantages of RIP Software for DTG

The importance of digital textile printing has grown significantly throughout the last decade. While the process is challenging and the workflow must be well understood, technological advances in software, printing equipment, print heads and inks, have allowed the creation of more cost-effective solutions for short print runs.

Direct-to-garment [DTG] printing represents a growing segment of this market. This is because of the technology’s ability to customise garments. The basis of DTG production is finished and, in many cases, pre-prepared garments, which can be used for customisation both on a large scale and in small volumes. There are two types of machines on the market: commercial and industrial. Traditionally, the first ones were found in local businesses where very short customisation runs or premium clothes were produced. In contrast, the industrial printers are responsible for larger runs in factories that focus on outsourcing. 

Today, a hybrid between the two previous models is emerging and the popularisation of mass customisation, boosted by the growth of ecommerce, is facilitating that. With this model, companies provide users with a production centre in just a few clicks. They will be able to print their own designs on-demand and with no minimum or maximum number of repetitions. It enables companies to be more flexible in responding to both individual orders and larger print runs. 

From a supply chain point of view, there is a requirement among print service providers for both machine types, either through synergies or by expanding resources. For this reason, DTG is gaining more and more strength as it allows companies to choose from a wide range of devices which can adapt to the needs of each manufacturer and situation on an individual basis, thus simplifying customisation in the fashion and apparel market. 

RIP software for DTG printing

Behind every good DTG print, there is a learning process based on the technology used to create a workflow, how this technology has been adapted to meet the needs of the print service provider, and the requirements of the end consumer. Manufacturer’s must learn about the printers, the inks, the fabrics, and especially the software to enhance results. 

RIP software is responsible for interpreting a file and calculating how many drops of each colour will be needed to obtain the best results. It does this while considering the productivity of the printing device. 

In other words, if you invest in a DTG printer, whether industrial or desktop, RIP software is the solution to allow manufacturers to get the most out of a printer’s functionalities. 

Inèdit always recommends RIP software with modes specifically designed for DTG printing. But which key features should be measured when looking for the right RIP software?

The right software

It is important to consider colour management. With RIP software you can operate with CMYK and RGB colour profiles. The difference between the two methods lies in the way they interpret the colours they have. In short, CMYK profiles have four inks and create colours from the superposition of these. White is created from the absence of these colours and black is created from the sum of these colour profiles.

Meanwhile, the RGB method has three inks and creates new colours from the variation of their light. This allows for the interpretation of a wider range of colours. Therefore, a RIP that works in RGB will significantly increase the number of colours that a printer can export, thus improving printing quality.

An RIP software’s calibration system also influences the accuracy of a colour base when printing. Calibration is carried out to understand what colour interpretation capacity a device has, and then indicates how each of the colours and gradients should be exported. An intuitive and fast calibration system is what Inèdit recommends when printing DTG. RIP software should also have integrated concepts to calculate the ink limit, make linearisations, and see the profile of the printer in operation. 

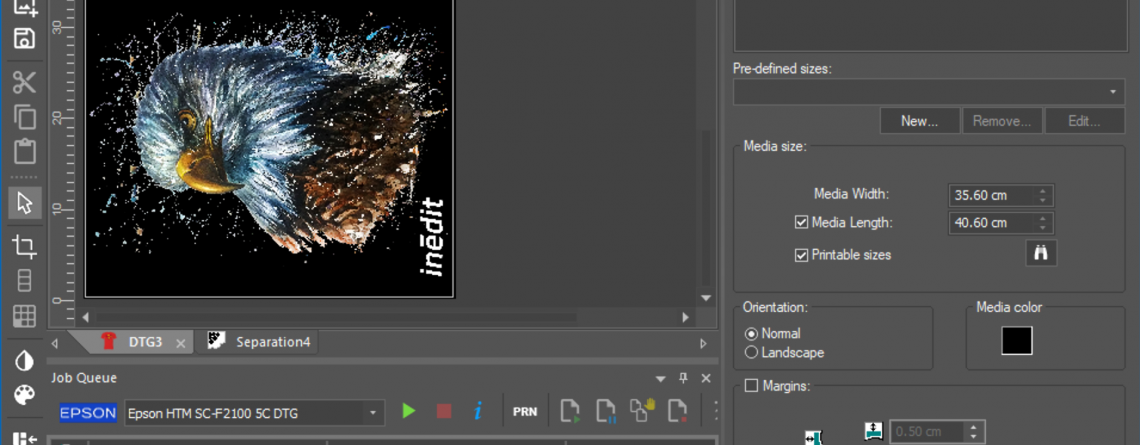
Additionally, in discovering the right RIP software, white management must be factored in. The white channel in DTG printing is one of its main features. With the correct white management, it is possible to save money and ink in production runs. In DTG printing, the white channel is used to create a layer between the substrate and the ink when the substrate is black, or a specific colour, so that the colour of the printed ink is not affected by the substrate. The disadvantage of not managing this channel is that the use of white ink increases significantly, thus affecting the price of production. It is therefore important to have a RIP software that has a set of defined standards. 

For instance, neoStampa Delta incorporates different printing modes depending on the use of white ink. Printers can choose between creating an all-white background under the drawing, or use default values for black, grey and coloured backgrounds. 


Another benefit of the white channel generation is that it allows hybrid DTG printers to detect the white they are going to print first and the colour channels they are going to put on top of it.

However, the settings for black backgrounds should also be understood. The RIP software should allow print service providers to use the black background of a T-shirt, for example, as to avoid using black ink or creating greys by mixing white ink with the same background. By using this type of configuration, up to US$0.60 per print, and up to 30% of white ink consumption, can be saved. 

Moreover, RIP software should have a choke system. This is the method that avoids registration problems when printing an image on a background colour. It should also support transparency: accept several formats that use a transparent colour or an alpha channel and take advantage of the T-shirt background. 

On-demand printing

DTG print service providers have traditionally provided for end consumers on-demand thanks to growth in ecommerce.  However, there is growing trend among leading brands to capitalise on the growing demand for personalised fashion and Web2Print. Some larger brands have been implementing DTG to limited short-run collections based on the latest fashion trends inspired by online influencers and celebrities. 

In the industrial field, this translates into the need to generate more agile communication with the customer and faster and more efficient production. Therefore, digital printing continues to grow as it allows for the start and stop of print runs at any time.

Web2Print has been born in response to this new trend. It consists of personalisation at its maximum exponent, allowing a customer, both individuals and businesses, to send a file in a specific format from 

a website so that the manufacturer can print it directly, whether it is just one unit or a short print run. But how can RIP software help in this whole process? 

Firstly, it maintains the colour output that the customer expects when sending a file and secondly, it helps the manufacturer organise the workflow and extract cost information. 

If a customer sends a file with an embedded profile – for instance, Adobe RGB or Apple RGB – it is easy for the manufacturer to access those from their RIP software, as long as it is specialised in RGB. This way, the printed colours will meet expectations because they accurately match what the customer saw on screen when they originally placed the order. This process also reduces the need for sampling. 
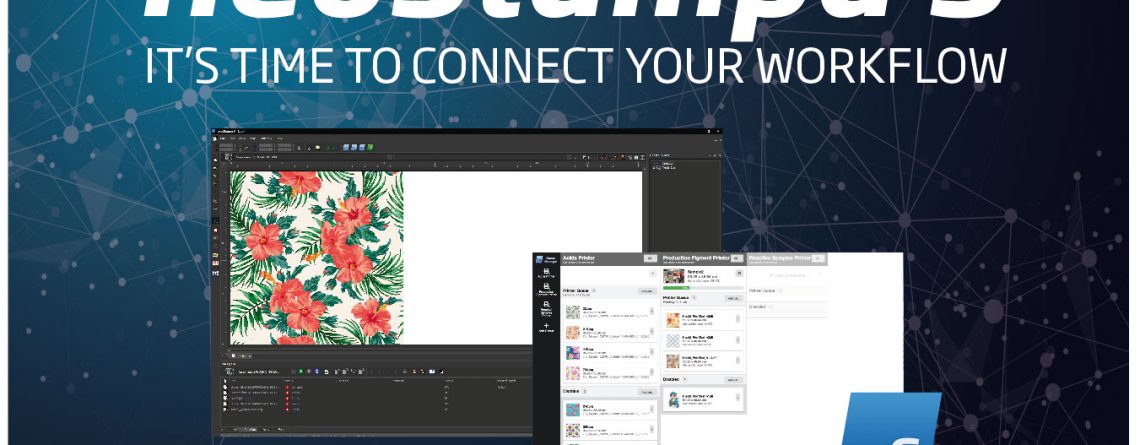
From a manufacturer’s point of view, Inèdit highlights two drawbacks that could be solved with a good RIP software. The first of these is a lack of organisation when receiving work orders and transferring them to production. A very useful concept included in some RIP software is the print queues. These arrange pending work orders into different queues according to the production printer that is going to be used. 

In addition, there is some RIP software, like neoStampa, which enables users to access print queues remotely from anywhere in the world: printing sequences can be organised, the preferred output for each machine can be set, and print runs can be stopped and resumed at any time. All of this can be dictated from outside the manufacturing facility and simplifies the flow of communication from any department anywhere in the world. 

Furthermore, it is important that the software incorporates a cost control screen. This is how manufacturers put a price on orders placed online or remotely. A cost control system will consider both the productivity of a company and the costs derived from it. Therefore, by knowing the units needed for each run, the current ink price, and the cost of consumables, basic production costs can be generated. That helps manufacturers apply a final price to the printed product. 

[sub-head] neoStampa Delta for DTG

For years, Inèdit has been working with leading DTG printing brands such as SanRoq, Epson and Brother but this year has taken a further step by launching a new version of neoStampa Delta which is equipped with a module dedicated to the high-growth digital DTG printing market. The latest software upgrade is designed to work with both small- and large-format printers.

Read more...

Inèdit Software presents neoStampa Delta, featuring a DTG mode and a new PDF print engine.

The new release of Rip Software will feature a new engine for faster and more accurate PDF printing, a specific mode for DTG and  performance and color reproduction improvements.

Barcelona, November 9th 2020

On November 4th, Inèdit Software presented the new version of neoStampa Delta. They did it from a virtual event where the same creators of the software and several collaborators exposed the news of Rip Software, which aims to be a revolution in the digital printing sector. 

Until now, neoStampa has been the reference Rip Software in digital textile printing, especially for the most demanding ones with color reproduction, achieving the maximum potential of their printers. With the Delta version, the company intends to go one step further and extend the scope of neoStampa to other sectors such as sports printing, film, ceramics or DTG printing. 

One of the main new features of neoStampa is the incorporation of a new PDF engine, the Mako® system from Global Graphics®, which enables any PDF/X standard file to be replicated, guaranteeing consistent results. In addition, we can see an improvement in performance, printing up to 5 times faster. 

The incorporation of an improved PDF engine will allow the Rip Software to be for the first time a perfect option for sectors such as sports design printing, advertising graphics printing, ceramics, film, among many others. 

On the other hand, neoStampa Delta also includes the new DTG printing mode with which it will not only be possible to print directly to garment with better color results, but also to save up to 50% of white ink. neoStampa Delta includes a calibration wizard in just two steps and also a new white base adjustment under semi-transparent areas, which will allow  the savings mentioned above. 

Finally, neoStampa Delta has a new cost control system with which it will be possible to track jobs in real time, knowing the meters printed, the speed and the ink consumption, of all printers. 

With the incorporation of all these innovations, Inèdit Software offers to the digital printing market a versatile version, with a multitude of applications, in order to obtain the best color reproduction of each print. neoStampa is compatible with more than 700 digital printers and every month they are offering new compatibilities to the market. 

Inèdit Software has not yet revealed the release date of neoStampa Delta, however all the information is already available on its website, and there are also different ways of contacting those who want to try the software for free. 

More information: https://www.inedit.com/en/neostampa-delta/

Read more...

Q&A Session: All the answers, without secrets!

To contribute to the quarantine, we organized a Q&A live session with our experts. Our customers had the opportunity to ask us all their questions and we answered. Would you like to learn a little bit deeper about color management and textile design? Keep reading and discover all our secrets! 


neoStampa and Color Management:

1. What do you think is the default lighting condition in textile printing to judge color? D50 or D65?

D65 in textile, D50 in graphic art. Usually, We use the D65 as standard, but the condition must be set according to the user ambient light standard or according to Lightbox they’re using.

2. Is it possible to print not to a printer but to a lab tiff file export?

It depends on the neoStampa connection to the printer. There are machines that require multi-tiff files to print. For example, a Reggiani Machine has its own machine software, therefore neoStampa would send a series of tiff files with the color management already done to the machine. Once the files reach the printer, the operator simply has to choose the number of copies to print.

3. As RGB is a bigger color space than CMYK, does monitor profiling really helps? If yes, how?

When we calibrate a monitor, we usually have a huge profile from the Monitor vs a smaller profile from the printer. What we do is to install the printing profile on software like Photoshop, which allows us to use a proofing tool to see the printer colors on the screen. In order to do that we need also a calibrated proofing monitor in order to match colors and see the best results in it.

It does help if you use the real printer profile in Photoshop. Usual Adobe RGB  or sRGB profiles are bigger than the printer profile, therefore you should limit the color possibilities you see on the screen. In

neoStampa the extra colors are included in the profile, it doesn’t matter if your printer is CMYK or CMYK+RGB, the profile creation process is the same and the color gamut size will depend on the number of colors, the paper/fabric used and the type of inks.

4. I’d like to know the “optimal” workflow for printing with fluorescent spot colors. Can I prepare the file in Photoshop and print directly or do I need to manage the spot colors through the neoStampa?

Although there is an automatic option to create a fluorescent, we are aware that some time you would need to work in spots.  So you have 2 options:

  1. We have the possibility to do it in Photoshop, preparing the file using Alpha Channels, and then replace them with fluorescent ink. We can also do it in Illustrator.
  2. Calibrate the machines with neoStampa using fluor colors and print an image. neoStampa will decide automatically where to apply the fluorescent

5. Iccmax is using a spectral light source and not only D50?

In neoStampa we use always a spectrophotometer to measure and we save all the data, not only D65. You can also consult the spectral curve and switch from D50 to D65.

When we measure the Colors with a spectrophotometer we get the spectral data while old colorimeters only get the color information. So we save all the spectrum of the light. Sometimes when you select one light you also get the color information, in only that light. In Spectro, you can choose any light you are using. With neoStampa, we work with all this information because we save the spectral data of the device and we are able to work with it.

6. Does neoMatch correct RGB values or spot colors?

neoMatch works with the printer profile. So, we measure the color, we print it and we measure again. With this process, we can see the differences and correct RGB values. This is the main idea of neoMatch. After that, if we find a difference, neoMatch automatically reprint colors and try to correct these differences. So we can create almost identical copies of the original library. After that, when we get the best precision, we can also consult the delta E, have an estimated number colors that we could get, which ones we can improve, etc., So the answer is yes, we correct the RGB values but we also have a function inside neoStampa that allows us to replace this to Spot Colors, correcting both values.

7. What is the connection between neoStampa and neoMatch?

When we correct a library,  we can export it and upload to neoStampa such that when neoStampa receive a color, it doesn’t matter if its an RGB color (the original) or a Spot Color (For example, colors from a library of illustrator or Photoshop with an own name) the software will recognize it and will find the color on the library you created in neoMatch. Everything will be done automatically.

8. Is possible to create a paper sample and then print the same on the fabric?

A Proofing paper machine should be able to simulate the same colors like a digital printer. With neoStampa we have a tool that allows understanding the two-color profiles to be equal.

11. It is always necessary to read 3 times the patches when generating the ICC??

We recommend it 100%. Measurements are the basis of all we do. If you read only once, you might be introducing errors -measurement error or from the printout itself-. If we want to reproduce a color later is essential.

12. I would like to have more information about the option of checking the consistency of the profile and re-profiling.

When we re-profile, we print a small chart which is a selection of colors from a larger profile, the same we have been using during calibration. That’s useful to compare if the printer is still printing the same then it used to do previously. So,  we compare the results of the measurement with the original one. As a result, it is very easy to see if there has been a change of the color printed and the stability within the time. It allows us to analyze if we are printing the same or not and if it is worthwhile to do a profile again.

13. How does the Print Server work?

The print server is a queue outside the neoStampa. It’s faster and can also be connected to other softwares. Therefore, it can be linked with all Inèdit programs. Furthermore, from a Tablet, entering the IP of the machine, you could see the queue of your Print Servers, control the machines and all the jobs of your company.

14. You recommend working with CMYK profiles embedded from Adobe Photoshop or only the ICC that is made in neostampa?

We recommend working with the one from neoStampa if you want to see the same colors that you will be able to print. If you work with Adobe’s, the colors may be different. Even though, when you transform a file that you have worked with a CMYK embedded, neoStampa will read the colors and reproduce them as well as it can.

15. I’ve always seen that Neostampa is a specialist in fashion designs but in vector designs, it gets a little complicated, is that so?

We understand that for Fashion Design you mean pixel images. Not that complicated: vectorial designs (such as PDF, illustrator, EPS, etc.) have many different visualization options and when it comes to neoStampa we cannot know what type of option you had selected in your editing software. This is the main problem. In Illustrator, for PDFs there’s a more restrictive system, called PDF/X-1a that restricts all these variables much more, trying to ensure that there are no errors of interpretation. In an image created with Photoshop, for example, the image is created pixel by pixel with the information of each pixel so that it is easier to interpret by neoStampa.

16. Assigning the profile from Illustrator requires a parameterization at the time of export?

If you work with profiles in Illustrator, when you have an embedded profile, you have to make sure that the option to include embedded profiles when exporting is activated.


neoTextil and Workflow Management:

1. I work in the building materials industry, plaster, and cement-based surfaces. We have already NeoStampa, how can we use the ICC profiles in photoshop?

When we make calibration with neoStampa it contains also a profile. A profile is a space where we can find, exactly, all the colors that our printer is able to reproduce. Once created, you can export this profile, install it in your computer and use it in Photoshop. So, finally, you will know exactly the colors that you can reproduce and you could see in the screen the same colors you will print. So the benefits are:

  • You will see, while you are creating a new design, exactly the colors that you will print afterward.
  • And you make sure that the colors you are exporting are the ones that will be printed, without losing information during the processes.
  • If this profile is installed in all the computers of your companies, everyone will be able to see exactly the same colors, avoiding color misunderstandings before and after printing.

2. Can you explain how to use Multicomia for silk screen:

In neoTextil we have two separations modules: nT Masquerade and nT Multicomia. nT Masquerade is more focused on Digital Printing, because its easier, intuitive and automatic and you can separate the colors only with a double click creating, in the end, a precise color file but more useful to create colorways. In the traditional printing industry, you will use the channels to reproduce the colors, for that reason, we created nT Multicomia: This is more personalized, you select the colors with professional tools more focused on Engravers.

3. We work on textiles and we are considering purchasing a new printer for cataloging our Designs, is there a list somewhere of which printers are supported by these profiles?

It’s not about printers, it’s about printing with neoStampa. So we can assess you with which machines work with neoStampa and then you could work with profiles.

4. Can we use nT Masquerade to create color separations for Traditional printing?

Yes, you can use an RGB image and create channels. But, as traditional printing needs more precise colors, you probably would need to adjust the channels with photoshop tools. Instead of nT Masquerade, we also have nT Multicomia that allows us to separate colors more precisely, avoiding to edit them later.

6. Which kind of libraries and formats can neoTextil work with?

To work with color libraries we will need to work with nT colorations. We usually use LAB data however, you can upload any format and nT Colorations will transform to LAB values.

7. Can we export psd files to save the change we have been doing with the plug-ins?

Yes, actually, every time you finish working with a plug-in you will have the “export” option, which will generate a new tab in Photoshop, so you can save it like a normal Adobe file. Furthermore, If you are working with a plug-in and you close it without export the file, the plug-in will keep saved the changes you have done.

9. Do you recommend working with neoStampa icc with nT Colorations in order to have the same results?

You can use it or not. But it will be better if you install neoStampa ICC to see directly in nT Colorations the same colors you will print.

10. Can I print directly from nT Colorations?

Not directly from nT Colorations but you can do it from Photoshop. We have the Printing Panel where you can send any file you have open in Photoshop to your neoStampa queue.

11. If I have a Virtual Vision file already done and I want to apply different designs and share it with my customers, how should I do?

With the plug-in you can use any design, apply it to the model and then export it in a Photoshop file. Then we have another software, our of Photoshop, called neoCatalog where you can upload your designs an apply directly to the models you have done in one click, and share directly with the client.

12. Can I upload Spot Color Libraries, for example, libraries from customers with 8 color printing machines?

Spot colors are color references that come directly a specific machine inkset. This means that a spot color in one machine is not the same in another machine. That why it is better to work with real colors, which you can measure and store them.

13. Someone, who has different printers can convert more than one ICC on nT Colorations?

Yes, you can convert one per one and export it altogether.

14. Although you have one profile for each printer and those are similar between them, do you still need to create a new file for each machine?

It will depend on the profile workflow set. But if you have one profile for each machine, the best solution is to export with each one.


Thank you for reading to us! If you have any questions, please send us an e-mail to marketing@inedit.com and we will try to send you an answer or maybe, start another webinar!


Read more...

neoStampa 9: The new version of the RIP Software that will allows you to connect your workflow

This September Inedit Software will launch neoStampa 9, the new cutting-edge version of the most popular RIP software for textile digital printing.

neoStampa 9 was born with the idea of facilitating the connectivity of complex workflows. Among its many new features, the most remarkable is the Queue Manager. With it the user will send the printing jobs to different printers in a heartbeat, reducing the job processing time and organising the job queues like a PRO. The new Queue Manager will apply the technology behind Inedit’s PRINT SERVER application, which will become the main ripping station inside neoStampa 9. It will be simply faster and easier to use.

Furthermore, neoStampa 9 includes an upgraded version of the Calibration Wizard, the renowed profiles application. The new Calibration Wizard will include a new linearization process which will generate more precise color curves. Beside, it will come with an intuitive interface and even a 3D visualisation of the profiles, for even better color management.

Finally, with neoStampa 9 it becomes even easier to connect with other textile tools. Thanks to the new QUICK PRINT panel, you will directly print designs from Adobe Photoshop®. The QUICK PRINT panel is not only connected to Adobe Photoshop® but also to neoTextil and neoCatalog , in order to give to the user full control over the textile workflow.

Compatible with the majority of digital printer brands, neoStampa has in recent years become the RIP Software of reference for digital textile printing. Thanks to its unique color management system, prints can be matched regardless of the media, inks and printer used.

Inèdit Software will officially launch neoStampa 9 on September 9, 2019 and will present it with a Webinar where they will show all the new features.

Read more...