Tag - neoStampa

DTF vs DTG: Which is the best alternative?

The pandemic has prompted the small studios focused on Print-on-demand production and with it, DTG and DTF printing have hit the market, increasing the interest of manufacturers who want to start working with personalized garments.  

Since now, Direct-to-garment (DTG) has been the main method used for t-shirt printings and small productions, but in the last months Direct-to-film or Film-to-Garment (DTF)  has generated interest in the industry, winning every time more supporters. To understand this paradigm shift, we need to know what the differences are between one method and the other. 

Both types of printing are suitable for small items or personalisation, such as T-shirts or masks. However, the results and the printing process are different in both cases, so it can be difficult to decide which one to choose for a business. 

DTG: 

  • It needs pre-treatment: In the case of DTG, the process starts with the pre-treatment of the garments. This step is necessary before printing, as we are going to work directly on the fabric and this will allow the ink to be well fixed and avoid transferring it through the fabric. In addition, we will need to heat the garment before printing to activate this treatment.
  • Printing direct to garment: With DTG you are printing Direct to Garment, so the process can be shorter than DTF, you don’t need to transfer. 
  • White ink usage: We have the option of putting a white mask as a base, to ensure that the ink does not mix with the colour of the media, although this is not always necessary (for example on white bases) and it is also possible to reduce the use of this mask, putting white only in some areas. 
  • Printing on cotton: With this type of printing we can only print on cotton garments. 
  • Final press: To fix the ink, we must do a final press at the end of the process and we will have our garment ready. 

DTF: 

  • No need for pre-treatment: In DTF printing, as it is pre-printed on a film, which will have to be transferred, there is no need to pre-treat the fabric. 
  • Printing on film: In DTF we print on film and then the design must be transferred to the fabric. This can make the process a bit longer compared to DTG. 
  • Adhesive powder: This type of printing will require the use of an adhesive powder, which will be used just after printing the ink on the film. On printers specifically created for DTF this step is included in the printer itself, so you avoid any manual steps. 
  • Use of white ink: In this case, it is necessary to use a layer of white ink, which is placed on top of the color layer. This is the one that is transferred onto the fabric and serves as a base for the main colours of the design. 
  • Any type of fabric: One of the advantages of DTF is that it allows you to work with  any type of fabric, not just cotton. 
  • Transfer from film to fabric: The last step of the process is to take the printed film and transfer it to the fabric with a press. 

So,  When deciding which print to choose, what considerations should we take into account? 

  • The material of our printouts: As mentioned above, DTG can only be printed on cotton, whereas DTF can be printed on many other materials. 
  • The production volume: Currently, DTG machines are much more versatile and allow for larger and faster production than DTF. So it is important to be clear about the production needs of each business. 
  • The result: The final result of one print and the other is quite different. While in DTG the drawing and the inks are integrated with the fabric and the feel is rougher, like the base itself, in DTF the fixing powder makes it feel plastic, shinier, and less integrated with the fabric. However, this also gives a feeling of greater quality in the colors, as they are pure, the base color does not intervene.
  • Use of white: A priori, both techniques need quite a lot of white ink to print, but with the use of a good Rip Software, it is possible to control the layer of white that is applied in DTG, depending on the base colour and thus reduce costs considerably. For example, neoStampa has a special print mode for DTG that not only allows you a quick calibration to improve the colours, but you can also choose the amount of white ink to use on different types of fabrics.

In a nutshell, DTF printing seems to be gaining ground over DTG, but in reality, they have very different applications and uses. For small-scale printing, where you are looking for good color results and you don’t want to make such a large investment, DTF may be more suitable. But the DTG now has more versatile printing machines, with different plates and processes, which allow faster and more flexible printing.  

Read more...

Understanding the advantages of RIP software for DTG printing

Inèdit Software assesses the benefits of direct-to-garment (DTG) printing, its impact on the industry, and how the use of the right software can improve production workflows and end results.

The importance of digital textile printing has grown significantly throughout the last decade. While the process is challenging and the workflow must be well understood, technological advances in software, printing equipment, printheads and inks, have allowed the creation of more cost-effective solutions for short print runs.

Direct-to-garment [DTG] printing represents a growing segment of this market. DTG printers can be used to customise products in large or small volumes. There are two types of machines on the market: commercial and industrial. Traditionally, DTG printers were used by local businesses where short customisation runs or premium clothes were produced. In contrast, industrial printers are responsible for larger runs in factories that focus on outsourcing.

Today, a hybrid between the two previous models is emerging and the popularisation of mass customisation is facilitating that. With this model, companies provide users with a production centre in just a few clicks. They will be able to print their own designs on-demand and with no minimum or maximum number of repetitions. It enables companies to be more flexible.

From a supply chain point of view, there is a requirement among print service providers for both machine types, either through synergies or by expanding resources. For this reason, DTG is gaining more and more strength as it allows companies to choose from a wide range of devices which can adapt to the needs of each manufacturer and situation on an individual basis, thus simplifying customisation in the fashion & apparel market.

Colour management is a persistent challenge but which RIP software can assist with

Inèdit is aiming to expand its signature neoStampa Delta software into the DTG market in 2020 following the inclusion of a new module

RIP software can streamline production and improve print quality

RIP SOFTWARE FOR DTG PRINTING

Behind every good DTG print is a learning process based on the technology used to create a workflow, how this technology has been adapted to meet the needs of the print service provider, and the requirements of the end consumer. Manufacturers must learn about the printers, inks, fabrics, and especially the software to enhance results.

RIP software is responsible for interpreting a file and calculating how many drops of each colour will be needed to obtain the best results. It does this while considering the productivity of the printing device.

Inèdit always recommends RIP software with modes specifically designed for DTG printing. But which key features should be measured when looking for the right RIP software?

THE RIGHT SOFTWARE

It is important to consider colour management. When choosing a RIP software you can find the ones that operate in CMYK and the ones that can also read RGB profiles. The difference between the two methods lies in the way they interpret the colours they have. In short, CMYK profiles have four inks and create colours from the superposition of those. White is created from the absence of these colours and black is created from the sum of these colour profiles.

Meanwhile, the RGB method has three inks and creates new colours from the variation of their light. This allows for the interpretation of a wider range of colours. Therefore, a RIP that works in RGB will significantly increase the number of colours that a printer can export, thus improving printing quality.

A  RIP software’s calibration system also influences the accuracy of a colour base when printing. Calibration is carried out to understand what colour interpretation capacity a device has, and then indicates how each of the colours and gradients should be exported. An intuitive and fast calibration system is what Inèdit recommends when printing DTG. RIP software should also have integrated concepts to calculate the ink limit, make linearisations, and see the profile of the printer in operation.

Additionally, in discovering the right RIP software, white management must be factored in. The white channel in DTG printing is one of its main features. With the correct white management, it is possible to save money and ink in production runs. In DTG printing, the white channel is used to create a layer between the substrate and the ink when the substrate is black, or a specific colour, so that the colour of the printed ink is not affected by the substrate. The disadvantage of not managing this channel is that the use of white ink increases significantly, thus affecting the price of production. It is therefore important to have a RIP software that has a set of defined standards.

For instance, neoStampa Delta incorporates different printing modes depending on the use of white ink. Printers can choose between creating an all-white background under the drawing, or use default values for black, grey and coloured backgrounds.

Another benefit of the white channel generation is that it allows hybrid DTG printers to detect the white they are going to print first and the colour channels they are going to put on top of it.

However, the settings for black backgrounds should also be understood. The RIP software should allow print service providers to use the black background of a T-shirt, for example, as to avoid using black ink or creating greys by mixing white ink with the same background. By using this type of configuration, up to US$0.60 per print, and up to 30% of white ink consumption, can be saved.

Moreover, RIP software should have a choke system. This is the method that avoids registration problems when printing an image on a background colour. It should also support transparency: accept several formats that use a transparent colour or an alpha channel and take advantage of the T-shirt background.

ON-DEMAND PRINTING

DTG print service providers have traditionally provided for end consumers on-demand thanks to growth in ecommerce. However, there is a growing trend among leading brands to capitalise on an increasing demand for personalised fashion via Web2Print. Some larger brands have been implementing DTG to print short-run collections based on the latest fashion trends inspired by online influencers and celebrities.

In the industrial field, this translates into the need to generate more agile communication with the customer and faster and more efficient production. Therefore, digital printing continues to grow as it allows for the start and stop of print runs at any time.

Web2Print has been born in response to this new trend. It allows a customer to send a file in a specific format so that the manufacturer can print it, and the order size is irrelevent. But how can RIP software help in this whole process?

Firstly, it maintains the colour output that the customer expects when sending a file and secondly, it helps the manufacturer organise the workflow and extract cost information.

If a customer sends a file with an embedded profile – for instance, Adobe RGB or Apple RGB – it is easy for the manufacturer to access it from their RIP software, as long as it is specialised in RGB. This way, the printed colours will meet expectations because they accurately match what the customer saw on screen when they originally placed the order. This process also reduces the need for sampling.

From a manufacturer’s point of view, Inèdit highlights two drawbacks that could be solved with a good RIP software. The first of these is a lack of organisation when receiving work orders and transferring them to production. A very useful concept included in some RIP software is the print queue. These arrange pending work orders into different queues according to the production printer that is going to be used.

In addition, there is some RIP software, like neoStampa, which enables users to access print queues remotely from anywhere in the world: printing sequences can be organised, the preferred output for each machine can be set, and print runs can be stopped and resumed at any time. All of this can be dictated from outside the manufacturing facility and simplifies the flow of communication from any department anywhere in the world.

Furthermore, it is important that the software incorporates a cost control screen. This is how manufacturers put a price on orders placed online or remotely. A cost control system will consider both the productivity of a company and the costs derived from it. Therefore, by knowing the units needed for each run, the current ink price, and the cost of consumables, basic production costs can be generated. That helps manufacturers apply a final price to the printed product.

NEOSTAMPA DELTA FOR DTG

For years, Inèdit has been working with leading DTG printing brands such as SanRoq, Epson and Brother but this year has taken a further step by launching a new version of neoStampa Delta which is equipped with a module dedicated to the high-growth digital DTG printing market. The latest software upgrade is designed to work with both small- and large-format printers.

Article written for Digital Textile Magazine

Read more...

5 tricks to create a good profile that only the best will know: 

A profile is one of the main concepts to know and master when talking about colour management. If you want to print accurate colours and get the most out of your colour output devices, you need to know the steps to get the best possible profile.

To start talking about profiles, we need to have the concept clear. So let’s go with a definition: 

A profile is a file that contains the colour information that can be interpreted by a device, either input (like a scanner or digital camera) or output (like a printer or screen). 

It is necessary to have two profiles: a standard one and the printer itself since the final profile will be created from a mathematical relation between the standard colour space (the input one) and the capacity of the device to interpret it. 

In this article, we will focus on the creation of profiles for digital printers. 


Introduction to the creation of profiles: 

To create a profile you will need to have some tools with you: a good Rip Software to help you interpret the capacity of your printer, a colour measurement device (spectrophotometer), the output device (The digital printer in this case), and other material needed (For example paper, fabric, plate, etc.)

In addition, we need to know which media you are going to use. If you are going to print on paper, the calibration and the consequent creation of the profile will be much easier, since only one material is involved in the process. 

If, on the other hand, we want to create a dye-sublimation profile, we have to take into account the tools that come into play: the plate, the fabric, the dye-sublimation paper, etc. so it is more complicated to create a stable profile. 


5 tips to create the best profiles: 

Now that we understand the concept of a print profile, we would like to share 5 tips that our technicians apply in order to obtain the best results: 

1.Create the profile using the final production conditions: It is important to understand that the process of creating a new profile aims to obtain the best colour results in the final productions. For this reason, it is necessary to reproduce the same printing conditions that we will use at the moment of truth. We do not recommend using cheaper paper or fabrics for calibration or using an iron instead of a calendar. With this, we only will obtain non-expected results. 

2. Work with Rip Software that facilitates the creation of the profile: It is very important to work with software that can understand the colour interpretation capacity of your printer, but it is also very necessary that the Rip Software facilitates the process of creating your profile. To do this, we recommend, first of all, that the Rip has a calibration wizard that guides you through this process step by step. 

3. Read, read and read: If you have ever worked with us or attended one of our courses you will know that there is a motto that we do always repeat: Read with the spectrophotometer three times. This way you will get three different colour results, which you can compare and get an average of the colour that will be the closest to the printing possibilities of your machine. 

4. Keep the printing devices in good condition: Check that at the time of creating the profile all the equipment involved in printing is in good condition and correctly configured. 

5. Profile and re-profile: We also recommend checking the printing results periodically and, if necessary, re-creating the profile. In neoStampa we have the option of re-profiling, which will allow you to analyse what has changed in your printer in order to adjust the profile again. 

We hope you have enjoyed our post and remember that if you have any doubts, you can contact us directly by writing to sales@inedit.com

Read more...

Design in RGB for better print results

Designing in RGB for printing is possible.

One of the first decisions we will have to face in the design process for printing will be the color method we want to use: CMYK or RGB. There is a general belief that we should work in RGB for designs that are going to be seen on a screen, while the CMYK method is for physical prints. Today in Inèdit’s blog we are going to dismantle this myth:

A bit of theory: CMYK vs RGB

The CMYK color model focuses on four colors: Cyan (C), Magenta (M), Yellow (Y) and Black (K). With CMYK we use the Subtractive method, by which colors are superimposed on the print to create the desired result. The absence of color will be white while 100% of the color black, but in addition, there is the “K” option that will allow us to create this black, with less ink consumption and a more intense color.
RGB is based on the colors Red (R), Green (G) and Blue (B) and works with additive synthesis, which consists of varying the intensity of light in the three main colors to create one again. This means that the more light we add, the brighter the results. So, 100% of light in each color will result in white and, conversely, 0% will result in black. In RGB, by playing with lightness we increase the variety of colors we can create compared to CMYK.

It is true that the vast majority of digital printers and plotters used to work in four-color printing, in other words, with the four colors that make up CMYK, limiting color results, but today this no longer happens.

Continue designing in CMYK?

In the digital printing sector things are changing a lot and color management and reproducibility are becoming more and more important.

Currently, printer manufacturers are focused on offering a greater number of inks, going beyond CMYK, in order to expand the color range of printing and be more competitive in the market.

We can find orange, blue, violet, turquoise, and even fluorescents in the ink options. In addition, the machines are constantly increasing their capacity, reaching to hold 8, 10 or even 12 different inks.
So we ask ourselves, does it make sense to keep working from the design only in CMYK, limiting the colors, when maybe the production printer has a wider color range?

Design in RGB to get the desired color results.
From our point of view, no. By using printers with a wider range of colors and working with all the necessary tools, it will be possible for you to end up printing the colors you see on screen, without having to juggle to imagine how the four CMYK inks will mix at the time of design.

One of the great allies for this color reproduction is the Rip Software you are using. For example, neoStampa is one of the rips that creates your print profiles in RGB. This allows you to have a standard color range, regardless of the number of inks in the printer, and that works in the same language as the designer’s screen or monitor. This way, you keep the color from the design until the final printing and the designer can focus on what really matters, creating with the colors that they like.

Read more...
neocatalog textile design software

Overcoming challenges with digital textile workflow (Article hosted by WTIN)

The textile printing sector is experiencing a period of inactivity due to the global quarantines established by governments because of Covid-19. The virus was first detected in China last December and soon brought the country’s textile industry to a complete standstill. This sent shockwaves through the textile supply chain and caused a dramatic drop in revenue for companies operating in the digital textile printing market.

By early spring, the virus had become a global pandemic and forced industries to reinvent themselves to overcome the economic and social crisis caused by the pandemic. In the textile printing sector, according to the latest study published by the ITMF, orders have fallen by 41% and a decrease in business of 33% is expected.

However, according to Inédit offices in China, bigger factories have survived by diversifying their activities. In contrast, small and medium-sized organisations have been left struggling to stay afloat.

This situation means companies are now considering new challenges. We find a sector that has come to a standstill, where the production chain remains static due to a lack of active suppliers and buyers. In Europe and the US, the consumption of fashion has been severely restricted to combat the virus, but when high streets are reopened there is no guarantee of a quick recovery. Brands and retailers have limited plans for the current spring/summer season and economists are forecasting worrying sales figures. Textile manufacturers in countries that rely on exports for a strong economy are bearing the brunt of this crisis.

But these current challenges have also opened up new opportunities in the sector. Some companies have chosen to branch out and manufacture much-needed personal protective equipment (PPE). In China, where economic recovery is under way, some textile printing OEMs are looking to expand their product catalogues by introducing a range of new machines that target face mask production.

Other enterprises have begun preparing resources for the implementation of digital textile printing technologies, whereas some are looking beyond the pandemic and are preparing for a more sustainable manufacturing industry.

INFLUENCE OF INKJET

Digital printing has been an ally of textile finishers in this moment of crisis because the technology is much more versatile than analogue alternatives. Companies that have invested in digital structures will be better placed to answer the immediate needs of clients. This is especially true if, during this transition, they have been maintaining the infrastructure that enables customised and on-demand printing.

These processes lead to a reduction in production costs for digital companies that will mean greater flexibility for the manufacturer when adapting to the new situation.

A common question being asked is how to prepare a digital team for this new norm?

We summarise it in two basic points: have everything ready to go; and improve communication in the workflow.

When we advise the client to be ready to proceed, we are referring to the importance of having the infrastructure in place by the time the industry starts up again, which will help to ensure a quick response. It is important to know the status of the printers and the best way to do this is to print a colour proof. With this test, companies will be able to see if their printers are still producing the same colours, or if they match their requirements. If necessary, the printers can be re-profiled to obtain the desired results. With neoStampa RIP software it is an easy process to carry out and this test will help organisations to better understand the health of the inks, print heads and the general quality of the printers they have. Preventative measures can then be taken to minimise machine downtime in the future.

It is not only necessary to prepare the machinery; it is also important to keep the team informed and prepared for new developments. Whether you decide to diversify your activity or wait for the textile sector to start up again, the design, production and commercial teams must be ready to start working.

CONNECTED WORKFLOW

One thing that particularly concerns our customers is how to maintain communication between departments, and even between customers, with current restrictions on mobility. This is what we call having the workflow connected in digital printing: being able to maintain communication between different departments without the need to be physically there.

Inédit Software has been working for years to create these connections, which are becoming more necessary with every passing day. Companies that base their designers at the headquarters in one country and print in another benefit the most from technologies that enable this level of communication. There are different solutions that help to improve this communication flow, which are specialised in the sector.

One of the main points of this workflow connection is the communication with the client. Although production is minimal in most economies due to order cancellations and border closures, design creation has continued and work on new seasons has already begun. Sales teams, therefore, must start selling the designs, but they cannot go to see the client or showcase the products at events.

Neocatalog Textile Design Software

An interesting solution is the creation of a virtual showroom through which clients can be presented with the designs that are for sale. Virtual showrooms enable businesses to demonstrate how simple it is to modify designs at a moment’s notice. There are even tools that will allow a business to present a design in a 3D simulation. The client will have the product at their disposal and the salesperson will have the facility to show it without having to be physically there. One tool designed specifically for this purpose is neoCatalog – a collection of designs that are stored on a business’ own server. neoCatalog enables designs and galleries to be sent directly to clients.

The second area of concern in the sector is communication within the company. One of the consequences of the pandemic has been the increase in teleworking around the world. Communication between design and production departments has always been the key to a good workflow connection, especially because of the need to accurately manage colour throughout the printing process which remains one of the biggest challenges in the market today. But with strategic workflow communication, it should be possible to send designs to print from anywhere in the world with the necessary color profile to obtain high-quality results.

FORECASTING THE FUTURE

We are optimistic about the future of the textile printing industry. Even though we are going through a rough patch right now, we are conscious of the power of digitalisation. We still anticipate big changes to come.

We believe the relocation of factories will be intensified and with digitalisation we are likely to see micro-factories appearing in new countries in response to fast fashion. But in the short-term, we believe companies will continue to expand their operations in order to capitalize on high demand for medical-grade textiles.

The industry needs to come to terms with a new reality in which software and connected systems are the protagonists and remote working becomes the norm. A company that has a well-communicated workflow and has the factory ready to accept orders – as well as one that can invest in new digital equipment – is best placed to survive this new era and prosper in the long-term. It is important to modernise so that customer needs are always met.

Read more...

8 workshops for printing designers for less than 15€

One of the secrets of creativity is to be permanently in training. And taking advantage of this quarantine to improve, is one of the best ideas we can have. For this reason, today we bring you a list of 8 excellent courses for print designers for less than 15€ that will help you to improve your skills!

In this list you will find the courses you may need to learn new illustration techniques, to improve the print design process and also to keep growing as a fashion designer. All of them, have been found in Domestika, where they are working hard to offer us their best content at a lower price during the quarantine.

So here you are, the list:

We start with this free proposal that Domestika makes available to us only during the quarantine. In this course, estimated at 39.99 euros, Violeta will teach us illustration techniques inspired by nature and femininity. There are 20 lessons that become 5 hours of training, unmissable for any designer who is looking for innovation and focus their patterns on nature or women’s figure.


With this course, Ana Blooms will give you the basis to start creating your own brand, with its history and its line, through the design of prints. You will learn some basics about illustration and the process of printing design.


The next proposal we bring you, even if it is not directly related to printing, is very interesting for all those who want to introduce themselves to floral design and then turn it into textile design. Maya introduces us to the world of acrylic with floral design, on the surface you prefer. She will give us tricks of composition, color, techniques, and much more!


Here is a specialized course in the whole process of designing textile prints. You will learn from Inés Aguilar how to get inspired by design, how to create different reports, finishes and see how colors behave in digital printing.


And if we continue with Inés Aguilar, we find this course, more focused on the creation of fashion garments and inspiration. In this one, the designer will transmit to us more than two decades of experience in the sector, from the complete process of creation of fashionable clothes.


With this workshop, take a step further with your illustrations and patterns. Learn to draw different patterns by hand, based on characters living together in colorful spaces. Be inspired by the ideas and techniques in this course to add a different twist to your next collection.


Another of the courses that will help you to complement your designs. If you would like to give a floral and botanical look to your new collection, in this workshop, Paulina Maciel teaches us the processes to make botanical composition illustrations in a precise way, taking the flowers and plants as a model.


BONUS: 

Find the color palette that best defines you at any given time with this course by Ana Victoria Calderon. You will learn color theory, mixing knowledge and theory to develop two color palettes applied to illustrations.


We hope you liked our post and we will be happy to hear from you if you finally do one of these courses and your feedback!


Thank you,

Read more...

Q&A Session: All the answers, without secrets!

To contribute to the quarantine, we organized a Q&A live session with our experts. Our customers had the opportunity to ask us all their questions and we answered. Would you like to learn a little bit deeper about color management and textile design? Keep reading and discover all our secrets! 


neoStampa and Color Management:

1. What do you think is the default lighting condition in textile printing to judge color? D50 or D65?

D65 in textile, D50 in graphic art. Usually, We use the D65 as standard, but the condition must be set according to the user ambient light standard or according to Lightbox they’re using.

2. Is it possible to print not to a printer but to a lab tiff file export?

It depends on the neoStampa connection to the printer. There are machines that require multi-tiff files to print. For example, a Reggiani Machine has its own machine software, therefore neoStampa would send a series of tiff files with the color management already done to the machine. Once the files reach the printer, the operator simply has to choose the number of copies to print.

3. As RGB is a bigger color space than CMYK, does monitor profiling really helps? If yes, how?

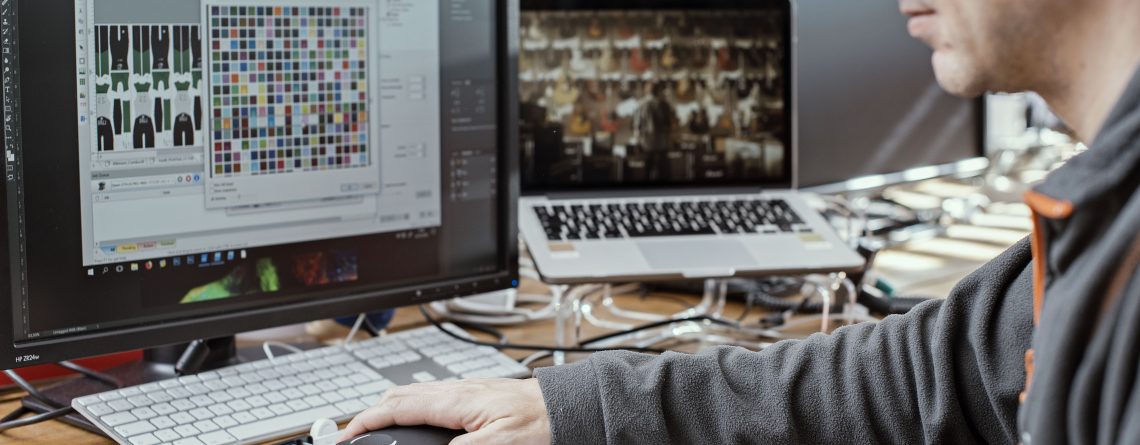
When we calibrate a monitor, we usually have a huge profile from the Monitor vs a smaller profile from the printer. What we do is to install the printing profile on software like Photoshop, which allows us to use a proofing tool to see the printer colors on the screen. In order to do that we need also a calibrated proofing monitor in order to match colors and see the best results in it.

It does help if you use the real printer profile in Photoshop. Usual Adobe RGB  or sRGB profiles are bigger than the printer profile, therefore you should limit the color possibilities you see on the screen. In

neoStampa the extra colors are included in the profile, it doesn’t matter if your printer is CMYK or CMYK+RGB, the profile creation process is the same and the color gamut size will depend on the number of colors, the paper/fabric used and the type of inks.

4. I’d like to know the “optimal” workflow for printing with fluorescent spot colors. Can I prepare the file in Photoshop and print directly or do I need to manage the spot colors through the neoStampa?

Although there is an automatic option to create a fluorescent, we are aware that some time you would need to work in spots.  So you have 2 options:

  1. We have the possibility to do it in Photoshop, preparing the file using Alpha Channels, and then replace them with fluorescent ink. We can also do it in Illustrator.
  2. Calibrate the machines with neoStampa using fluor colors and print an image. neoStampa will decide automatically where to apply the fluorescent

5. Iccmax is using a spectral light source and not only D50?

In neoStampa we use always a spectrophotometer to measure and we save all the data, not only D65. You can also consult the spectral curve and switch from D50 to D65.

When we measure the Colors with a spectrophotometer we get the spectral data while old colorimeters only get the color information. So we save all the spectrum of the light. Sometimes when you select one light you also get the color information, in only that light. In Spectro, you can choose any light you are using. With neoStampa, we work with all this information because we save the spectral data of the device and we are able to work with it.

6. Does neoMatch correct RGB values or spot colors?

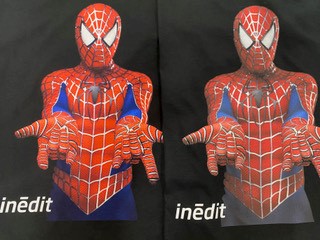
neoMatch works with the printer profile. So, we measure the color, we print it and we measure again. With this process, we can see the differences and correct RGB values. This is the main idea of neoMatch. After that, if we find a difference, neoMatch automatically reprint colors and try to correct these differences. So we can create almost identical copies of the original library. After that, when we get the best precision, we can also consult the delta E, have an estimated number colors that we could get, which ones we can improve, etc., So the answer is yes, we correct the RGB values but we also have a function inside neoStampa that allows us to replace this to Spot Colors, correcting both values.

7. What is the connection between neoStampa and neoMatch?

When we correct a library,  we can export it and upload to neoStampa such that when neoStampa receive a color, it doesn’t matter if its an RGB color (the original) or a Spot Color (For example, colors from a library of illustrator or Photoshop with an own name) the software will recognize it and will find the color on the library you created in neoMatch. Everything will be done automatically.

8. Is possible to create a paper sample and then print the same on the fabric?

A Proofing paper machine should be able to simulate the same colors like a digital printer. With neoStampa we have a tool that allows understanding the two-color profiles to be equal.

11. It is always necessary to read 3 times the patches when generating the ICC??

We recommend it 100%. Measurements are the basis of all we do. If you read only once, you might be introducing errors -measurement error or from the printout itself-. If we want to reproduce a color later is essential.

12. I would like to have more information about the option of checking the consistency of the profile and re-profiling.

When we re-profile, we print a small chart which is a selection of colors from a larger profile, the same we have been using during calibration. That’s useful to compare if the printer is still printing the same then it used to do previously. So,  we compare the results of the measurement with the original one. As a result, it is very easy to see if there has been a change of the color printed and the stability within the time. It allows us to analyze if we are printing the same or not and if it is worthwhile to do a profile again.

13. How does the Print Server work?

The print server is a queue outside the neoStampa. It’s faster and can also be connected to other softwares. Therefore, it can be linked with all Inèdit programs. Furthermore, from a Tablet, entering the IP of the machine, you could see the queue of your Print Servers, control the machines and all the jobs of your company.

14. You recommend working with CMYK profiles embedded from Adobe Photoshop or only the ICC that is made in neostampa?

We recommend working with the one from neoStampa if you want to see the same colors that you will be able to print. If you work with Adobe’s, the colors may be different. Even though, when you transform a file that you have worked with a CMYK embedded, neoStampa will read the colors and reproduce them as well as it can.

15. I’ve always seen that Neostampa is a specialist in fashion designs but in vector designs, it gets a little complicated, is that so?

We understand that for Fashion Design you mean pixel images. Not that complicated: vectorial designs (such as PDF, illustrator, EPS, etc.) have many different visualization options and when it comes to neoStampa we cannot know what type of option you had selected in your editing software. This is the main problem. In Illustrator, for PDFs there’s a more restrictive system, called PDF/X-1a that restricts all these variables much more, trying to ensure that there are no errors of interpretation. In an image created with Photoshop, for example, the image is created pixel by pixel with the information of each pixel so that it is easier to interpret by neoStampa.

16. Assigning the profile from Illustrator requires a parameterization at the time of export?

If you work with profiles in Illustrator, when you have an embedded profile, you have to make sure that the option to include embedded profiles when exporting is activated.


neoTextil and Workflow Management:

1. I work in the building materials industry, plaster, and cement-based surfaces. We have already NeoStampa, how can we use the ICC profiles in photoshop?

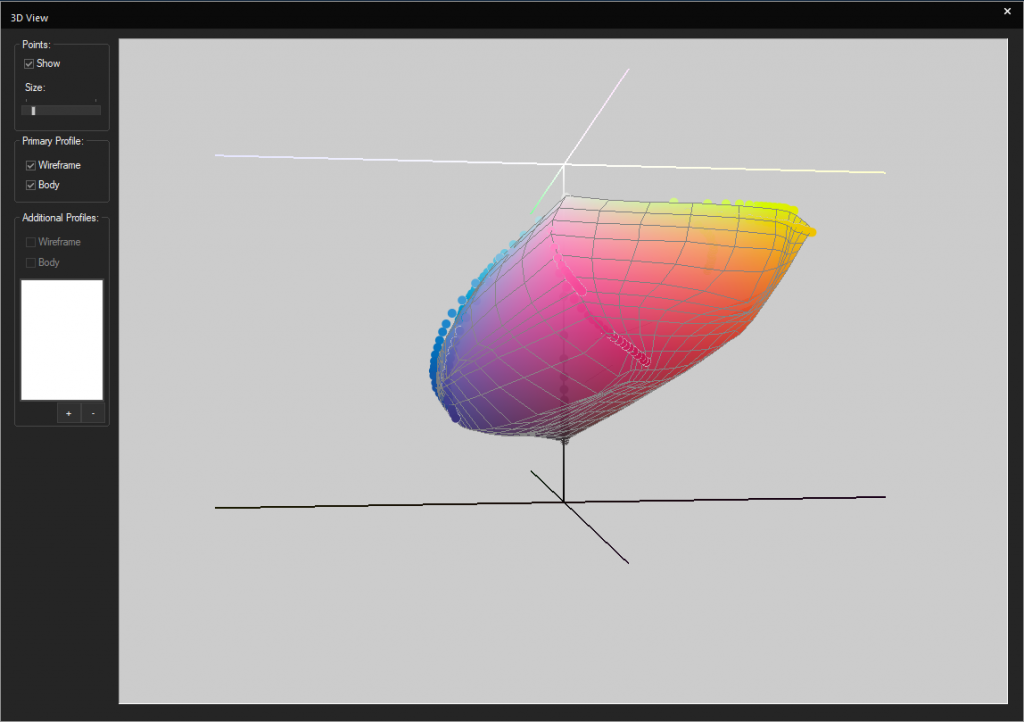
When we make calibration with neoStampa it contains also a profile. A profile is a space where we can find, exactly, all the colors that our printer is able to reproduce. Once created, you can export this profile, install it in your computer and use it in Photoshop. So, finally, you will know exactly the colors that you can reproduce and you could see in the screen the same colors you will print. So the benefits are:

  • You will see, while you are creating a new design, exactly the colors that you will print afterward.
  • And you make sure that the colors you are exporting are the ones that will be printed, without losing information during the processes.
  • If this profile is installed in all the computers of your companies, everyone will be able to see exactly the same colors, avoiding color misunderstandings before and after printing.

2. Can you explain how to use Multicomia for silk screen:

In neoTextil we have two separations modules: nT Masquerade and nT Multicomia. nT Masquerade is more focused on Digital Printing, because its easier, intuitive and automatic and you can separate the colors only with a double click creating, in the end, a precise color file but more useful to create colorways. In the traditional printing industry, you will use the channels to reproduce the colors, for that reason, we created nT Multicomia: This is more personalized, you select the colors with professional tools more focused on Engravers.

3. We work on textiles and we are considering purchasing a new printer for cataloging our Designs, is there a list somewhere of which printers are supported by these profiles?

It’s not about printers, it’s about printing with neoStampa. So we can assess you with which machines work with neoStampa and then you could work with profiles.

4. Can we use nT Masquerade to create color separations for Traditional printing?

Yes, you can use an RGB image and create channels. But, as traditional printing needs more precise colors, you probably would need to adjust the channels with photoshop tools. Instead of nT Masquerade, we also have nT Multicomia that allows us to separate colors more precisely, avoiding to edit them later.

6. Which kind of libraries and formats can neoTextil work with?

To work with color libraries we will need to work with nT colorations. We usually use LAB data however, you can upload any format and nT Colorations will transform to LAB values.

7. Can we export psd files to save the change we have been doing with the plug-ins?

Yes, actually, every time you finish working with a plug-in you will have the “export” option, which will generate a new tab in Photoshop, so you can save it like a normal Adobe file. Furthermore, If you are working with a plug-in and you close it without export the file, the plug-in will keep saved the changes you have done.

9. Do you recommend working with neoStampa icc with nT Colorations in order to have the same results?

You can use it or not. But it will be better if you install neoStampa ICC to see directly in nT Colorations the same colors you will print.

10. Can I print directly from nT Colorations?

Not directly from nT Colorations but you can do it from Photoshop. We have the Printing Panel where you can send any file you have open in Photoshop to your neoStampa queue.

11. If I have a Virtual Vision file already done and I want to apply different designs and share it with my customers, how should I do?

With the plug-in you can use any design, apply it to the model and then export it in a Photoshop file. Then we have another software, our of Photoshop, called neoCatalog where you can upload your designs an apply directly to the models you have done in one click, and share directly with the client.

12. Can I upload Spot Color Libraries, for example, libraries from customers with 8 color printing machines?

Spot colors are color references that come directly a specific machine inkset. This means that a spot color in one machine is not the same in another machine. That why it is better to work with real colors, which you can measure and store them.

13. Someone, who has different printers can convert more than one ICC on nT Colorations?

Yes, you can convert one per one and export it altogether.

14. Although you have one profile for each printer and those are similar between them, do you still need to create a new file for each machine?

It will depend on the profile workflow set. But if you have one profile for each machine, the best solution is to export with each one.


Thank you for reading to us! If you have any questions, please send us an e-mail to marketing@inedit.com and we will try to send you an answer or maybe, start another webinar!


Read more...
Digital Printing Workflow

Take a tour of digital printing at ITMA Barcelona with Inèdit Software

Inèdit Software together with some of the most important printing brands in the industry will take advantage of ITMA Barcelona to show a complete Digital Printing workflow.

From 20th to 26th June, the most expected exhibition in the sector, returns to Barcelona. At ITMA we can find all the important players in digital textile printing: printer manufacturers, paper and fabric suppliers, as well as ink manufacturers and software developers specialised in the industry, like Inèdit Software.

In order to share its more than 25 years of industry knowledge and show visitors exactly how a complete digital textile printing workflow works, Inèdit Software has joined the world’s best printer brands to show visitors an entire process from file preparation to final printing, obtaining the best market results. 

From hall 3 stand B133 Inèdit Software will make a tour of different stands showing the processes of digital textile printing. During the tour you will see how to prepare a file with Adobe Photoshop® and how to print in different kind of printers, from direct to textile machines to sublimation. All united by a common denominator, neoStampa, the Rip Software that allows printing on different machines obtaining exactly the same results.

This action has had a great reception among the collaborating companies, where we find great brands from all over the world such as MS, Aleph, Atexco, Flora, DGI, Homer, Mtex, Kerajet or Colorjet.

Moreover, in order to keep sharing knowledge on the market, Inèdit Software will contribute to the European Digital Textile Conference organised by the magazine wTin on June 24, where we will discuss, along with other companies, the importance of the digital textile workflow from concept to finished product.

Read more...